-1.png?height=120&name=DI%20Logo%20Dark%20(2)-1.png)
A custom URL for your organization that shows the available providers 'Waiting Rooms' for patients to check-in, all in one configurable view
-
Before creating a custom Clinic, your providers will need to create their own personalized waiting room - CLICK HERE FOR HOW TO CREATE A CUSTOM WAITING ROOM
-
To create your custom Clinic waiting room, page start in the telehealth tab located in the left margin

-
Select ‘Create a Waiting Room’ from the tab options at the top left of the screen

-
Here you will choose Clinic - Only Account Administrators will have the Clinic option available to them

-
You will add a name for your custom link and check its availability
-
Once checked and verified, a green check will appear, click Save

-
Once created, the administrator can configure the organization’s public-facing Clinic view
-
Each part of this configurable view is detailed below:

-
(A) You can copy the shareable custom link for your Clinic page by clicking the copy icon
-
(B) You can select only those you want to show in your Clinic view (C) or check the box next to ‘Select all Rooms’. Selecting only those you want to show in your Clinic view is used when providers only want to see patients by request, and do not want their waiting rooms to display on the Clinic
-
(D) Selecting a Designated NEW PATIENT Waiting Room creates a button, on the Clinic page view, with the text from the Button Text (E) field [ex. Are you a new patient? Check-in here.] This allows you to assign a waiting room that is specifically for new patients to check-in and start a telehealth visit
-
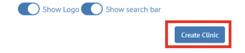
Show Logo (F): This includes the logo of your organization on the Clinic page
-
Show search Bar (G): This includes a search bar for patients to search a specific doctors waiting room --- if there are only a few waiting rooms to choose from, there should be no need for a search bar, so we made this configurable, to turn on or off based on the need
-
Once you have configured your Clinic view, you can click Create Clinic
-
If your provider has not yet created a personalized Waiting Room = CLICK HERE FOR HOW TO CREATE A CUSTOM WAITING ROOM
-
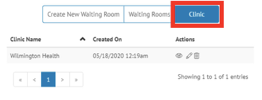
To view your created Clinic, click back to the Create a Waiting Room tab and choose Clinic to see your Clinic name listed

-
To View your Clinic as a patient would, Click the eye icon under actions

-
To check in to the providers waiting room the patient will select Join Waiting Room under the provider's name

-
They will then be taken to the check-in page where they will fill out their information, test their connection, and wait for their provider to Start Session
-
Once successfully checked in, the provider and any added users to the Waiting Room will receive a
- push notification at the top of their screen (pictured below)
- an email notification
- and the patient name will be listed under the room they checked into

-
To view more on how each custom Waiting Room works and the workflow that goes with it click here
-
To Edit your Clinic page - click the pencil icon under Actions


-
To Delete your Clinic page - click the trash can icon


*If you follow these steps and still experience issues, please restart your device