-1.png?height=120&name=DI%20Logo%20Dark%20(2)-1.png)
Learn how to initiate your first Telehealth visit from your Browser (Make sure you are NOT using Internet Explorer)
Initiating Your First Telehealth Visit
-
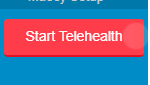
When you sign in at https://connect.docsink.com/dashboard/chat you'll see the red 'Start Telehealth' button on the left hand side
-
Click the 'Start Telehealth' button to view these options below
-
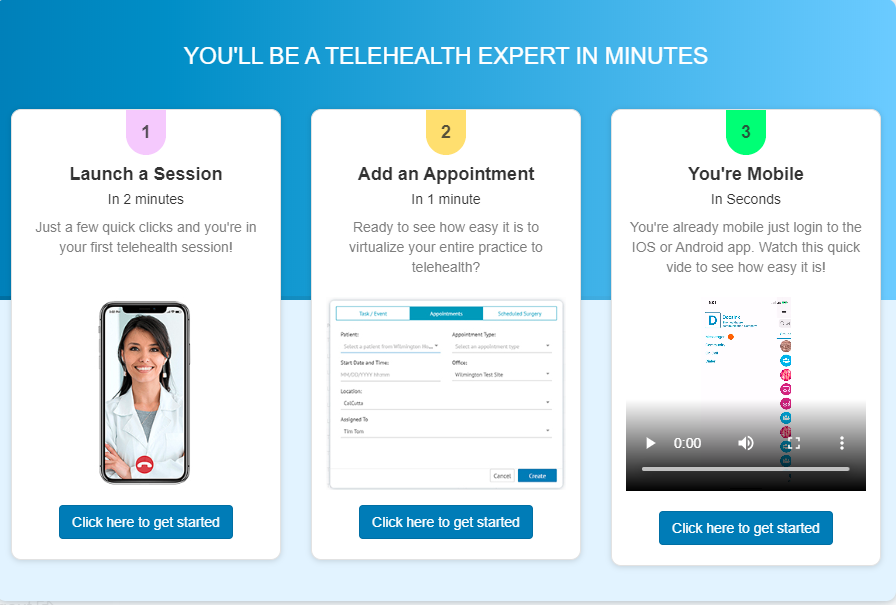
Here you are given 1, 2, 3 options
-
Will walk you through how to add a patient and launch a Telehealth session right away! **DO NOT CREATE A ‘TEST’ PATIENT WITH AN EMAIL OR PHONE NUMBER THAT WILL BE USED BY A STAFF MEMBER-- Use a personal email or a phone number of a friend to test this out-- if you are a user or are going to be added as a user in the future DO NOT use that email address or phone number**
-
Will walk you through how to add a patient and/or add your appointments you have scheduled with patients and start a Telehealth session from the scheduled appointment!
-
Shows you how to initiate a Telehealth session from your cell phone, iPad or tablet! **Important** You cannot add a patient from the mobile, iPad or tablet application. Adding a patient has to be done on the computer desktop app or website!
-
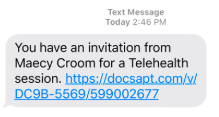
You’ve added your patient and now you’re going to click ‘Start Session’ and send them an invite through Email or SMS text
-
Once the invitation has been sent a new window opens
-
Select Join Now with Camera and Microphone on to ensure full Telehealth Connection

-
Session starts waiting for Patient to accept invite

Patient View
-
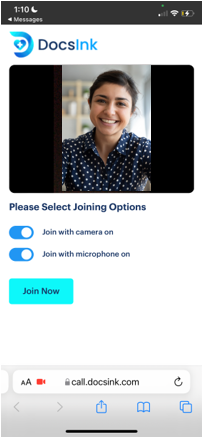
The great thing about DocsInk is that patients don't have to download an app!
-
Their invitation will go directly to their email address or to their phone number. If it is sent via SMS text to their mobile device their invite will look like this:
-
Once they click on the link they will be taken to the screen to Join Now with Camera and Microphone On to ensure full Telehealth connection
Welcome to your Telehealth session!

DocsInk Telehealth offers additional options during Telehealth Sessions

-
Chat - Communicate via text during session
-
Charge - available for Clinician once patient joins session; charge can be submitted at any time during session
-
Phone # - provides session number and passcode to for security
-
Link - copy and pasted to invite any additional participants
-
Users - displays all participants in the call (allows to mute participants as needed)
-
Screen - participants can share documents / lab results / radiology images etc.
-
Mic - Mute yourself as needed
-
Video - Turns video off / on as needed
-
Settings - Flips camera view from front to back
-
Leave - Leaves session open for all other participants
-
End - ends the call for all participants
*If you follow these steps and still experience issues, please restart your device